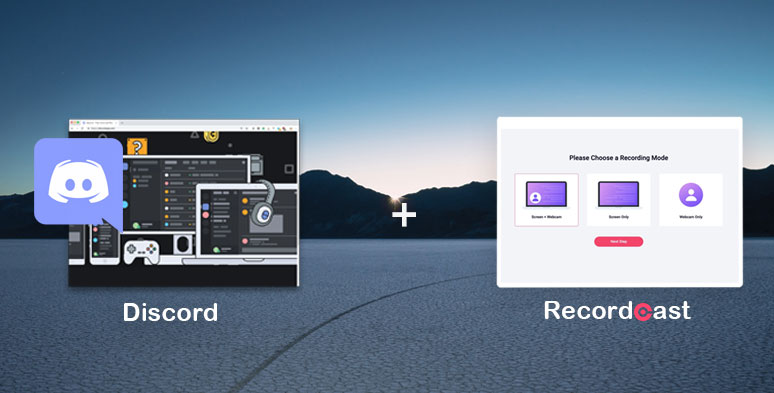
Discord allows gamers and friends to have a private and cozy chat like no other. You easily share screenshots and screens with friends, or have video calls or even live stream gameplay.
However, there is no built-in Discord recorder to record Discord audio or video calls. This makes it difficult for some like gameplay podcasters to record their conversations and upload to YouTube, etc.
In this post, we will walk you through the best options to record discord audio, even video calls using 3 third-party screen and audio recorders. All of them are 100% free to use and work for all users.
Contents:
First and foremost, please bear in mind that it is illegal to randomly record Discord audio or conservation. It’s advisable to give a clear notification to all the parties in the group chat on the server before you record the Discord audio.
How to Record Discord Audio with RecordCast
Well, firstly, what Is RecordCast and why use it to record discord audio?
RecordCast is a free and user-friendly in-browser screen recorder with a built-in video editor. You can use it to easily record the full screen, window application, or record any chrome tab with no software download needed.
Record Discord audio with RecordCast screen recorder
You may also create a picture-in-picture video recording by choosing “Screen+webcam” recording mode while recording both system audio and mic audio simultaneously. Then use its easy-to-use video editor to edit your recording with ease.
It works perfectly to record Discord audio and Discord video calls. So, please follow our A to Z guide to record Discord audio in detail.
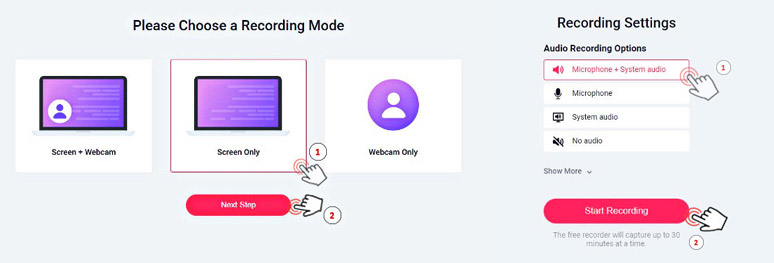
Set up the video and audio recording mode for Discord audio recording
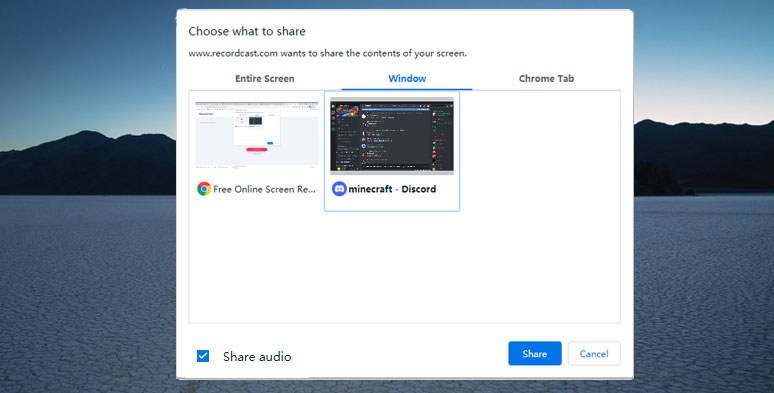
Select Discord app window for audio and screen recording
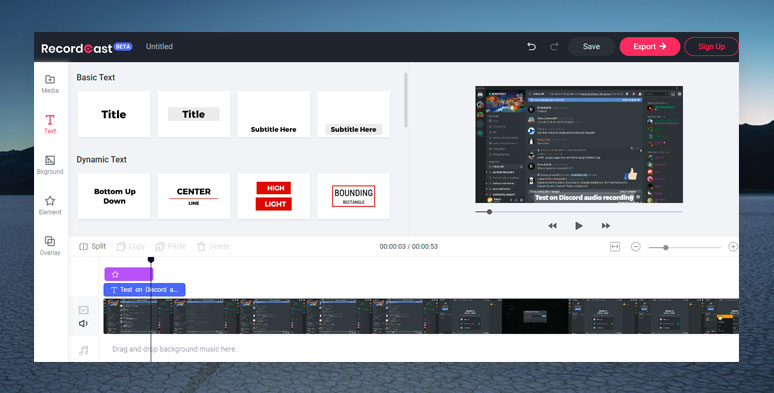
Edit Discord audio and screen recording in RecordCast’s video editor
You can trim and split the unwanted video and add captions, dynamic elements. If you are doing this for a podcast, you can import an audio, image, and video footage to create a full-fledged video in MP4 (1080P) to be uploaded to YouTube. Check how to record a Podcast with online guests.
After you are done with the editing, you can download MP4 to your local computer.
How to Record Discord Audio by Craig Bot (for Discord Server Owner)
So, what is Craig Bot and why use It to record Discord audio?
Well, you can take Craig Bot as an add-on or plug-in for Discord audio recording. What Craig does is that it can be invited to your Discord server and records multi-track audio files of each speaker for a Discord conversation and Craig bot can even upload recorded Discord audio to your Google Drive. Sounds cool?
Now, let’s find out how to record Discord audio by Craig Bot.
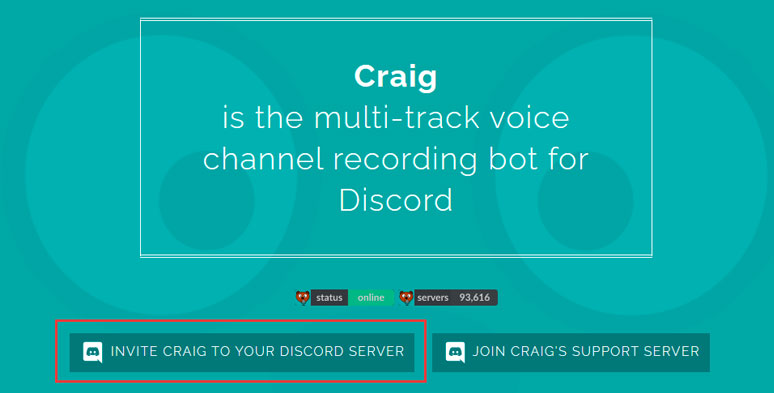
Invite Craig Bot to Discord server to record audio
Go back to Discord > click “General” under Voice Channel (make sure your mic is on) > head back to Craig’s webpage and copy the command: “:craig:, join” > paste the command in the chatbox under “Text Channel”. Then Craig will start recording audio instantly and it will also notify all the parties that the chat is being recorded.

Enter Craig code to allow Craig bot to record Discord audio automatically
Also, read the top 5 online screen recorder with audio.
Copy Craig’s leave command “:craig:, leave” and enter this command in the chatbox. Then Craig will automatically stop recording and leave the server. Meanwhile, Craig will leave you with a download link for the Discord audio, which will remain on the server for 7 days since it is created.
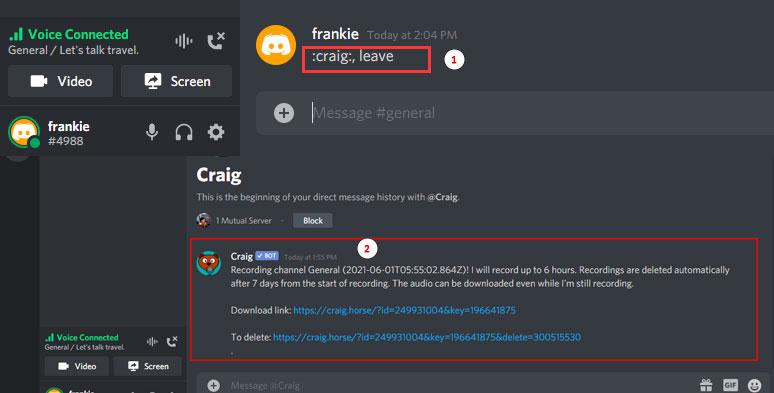
Tell Craig to stop recording Discord audio and get the link of audio recording
However, now you can go to your Google Drive. And you will find the Discrod audio recording is saved in the Craig folder.
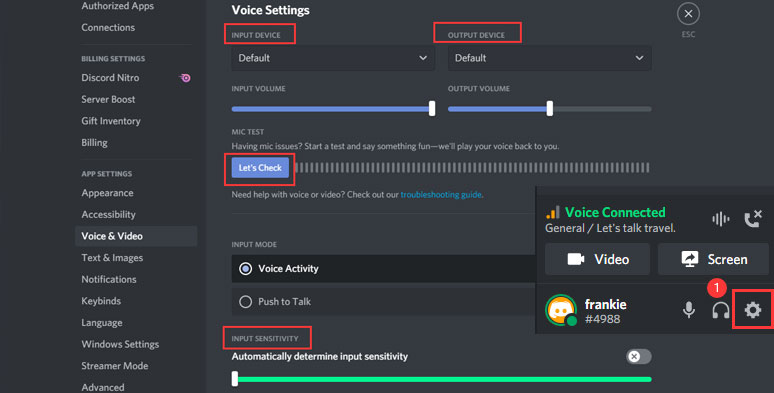
Customize the audio settings in Discord to get the best audio quality
You can test your mic volume by clicking on “Let’s Check”. And it’s advisable to pull the “Input Sensitivity” slider completely to the left. In this way, your recording won’t be muted by fault.
Meanwhile, go back to the setting button in “General” under Text Channel, and pull the Bitrate slider completely to the right for the best audio quality and click “Save Changes”.
How to Record Discord Audio with OBS
The last but not least solution we recommend to record Discord audio is using the hugely popular OBS, or Open Broadcaster Software. It’s a free and open-source screen recorder for video recording, making tutorial videos, and gameplay live stream. Check the 12 best software to record gameplay.

Record Discord audio by OBS studio
So, let's check the step-by-step guide to record Discord audio with OBS:
Launch OBS and click on “Tools” > Auto-Configuration Wizard > select “Optimize just for Recording, I Will Not Be Streaming”. This step will make it easier for first-timers to use OBS to record Discord audio.
Next, go to “Files” > Settings > Output > Recording> select "Recording Format" as MP4. Then, head back to "Files" > Hotkeys > customize the keyboard shortcut to start/stop recording, let's say, "Ctrl +F5".
Go to "Sources" > click on "+" button > select " Audio Output Capture" > name the source as "Record System Audio and click "OK".
Then repeat the same steps, but this time select "Audio Input Capture" and name the source as "Record Mic Audio" and click "Ok".
Now, OBS can record both your voice through the mic and other parties' voices in Discord conversation.
Meanwhile, you can see the audio volume of "Audio Output Capture" and Mic/Aux is in the "Audio Mixer" window as you speak. This means OBS is ready to record Discord audio now.
Press hotkey "Ctrl +F5" you customized to stop recording. Then go back to "Files" > "Show Recordings ". You will find your Discord conversation recording as a black video file in MP4.
Final Thoughts
Hopefully, our 3 detailed guides on how to record Discord audio will provide you with flexible options for Discord recording, either for pure audio or video calls.
If you are the owner of the Discord server, using Craig bot to record Discord audio is a great option. However, if you are only an invitee, either the flexible RecordCast or powerful OBS studio should be your first pick.

Hot & Trending
-

How to Record Yourself and Your Screen at the Same Time on PC/Mac
-
How to Record Any Chrome Tab with Audio in Clicks
-
8 Best Free Screen Recorders with No Watermark
-

Top 19 Tips and Tricks to Record Presentations as a Video
-
How to Record Facebook Video Calls with both Video and Audio on Desktop, iPhone, Android
-
How to Record Google Meet for Free Gmail Users (PC & Mobile)
-
Best Way to Record Gameplay on PC 2021
-

Best Ways to Record an Interview with High-quality Audio and Video on Mac