As more businesses and learning shift online, now, more than ever, you need to pick up the practical skills to record a presentation as a video for business meetings or teaching, etc.
So, in this post, we will share the best 19 tips and tricks you need to know to record any presentation as a video. Whether you are a rookie or officing veteran, and whatever apps you use to record a presentation, let’s say, PowerPower, Google Slides, Microsoft Teams or Keynote, Zoom, etc, you will get the answer for the most thorny issues you are having now.
1. 5 Must-dos Before You Record a Presentation
Recording a video presentation is more than screen recording the slides and adding your voice-over. It displays your professionalism and helps you win the respect of clients, teammates, and students. Here are 5 checklists before kicking off recording a presentation.
Believe it or not, 90% of the audience will shut off a video presentation if the audio of it sounds excruciating. Never trust your built-in mic on your laptop, it gets too much background noise. So do get a budget-friendly mic to begin with recording, like Rode NT-USB-Mini USB Microphone priced at only $99.
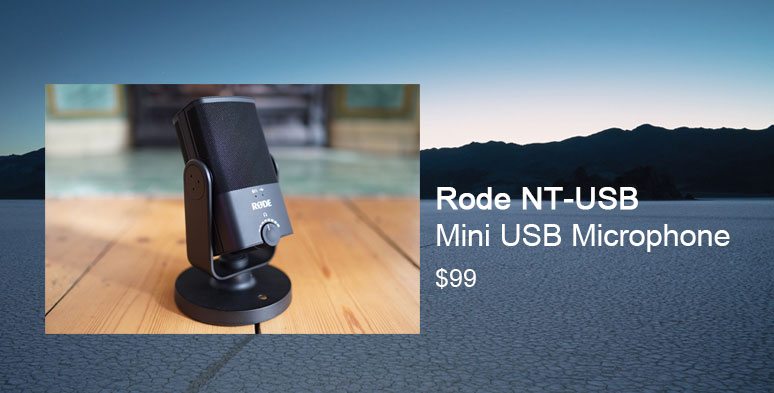
Nifty mini Node USB microphone
Your private bedroom or study room is an ideal place to record a voiceover for your presentation with little background noise.
If you need to record a presentation with a facecam, make sure you have an even ambient light over your face. Shut the curtains to avoid strong sunlight coming from your back. Never use overhead lighting or have a light source right behind your chin if you don’t want to frighten your students away. Check the 5 best webcam recorder.
Unwanted windows Chrome tabs, apps’ pop-ups, and incoming email reminders, etc. should all be turned off to leave a green space for your voice-over and presentation recording. Meanwhile, do have all the PowerPoint slides, images, and videos opened for your need.
No one is interested in seeing a presenter's flaring nostrils, or the bald head like I have, or only part of your neck the moment viewers open the PowerPower video presentation. Besides, it would be better off if you place your smiling face in the center of the frame.
2. Best Way to Customize the Recording Tab for PowerPoint Presentation
If you use PowerPoint Version 2019 or newer, you can customize the recording tab in the PowerPoint ribbon, which makes PowerPoint presentation recording far easier.
Here is how to add a recording tab:
Hover over to ribbon > right-click on it and click on “ Customize the Ribbon” > scroll-down tabs on the right-hand side and check “Recording” tab.
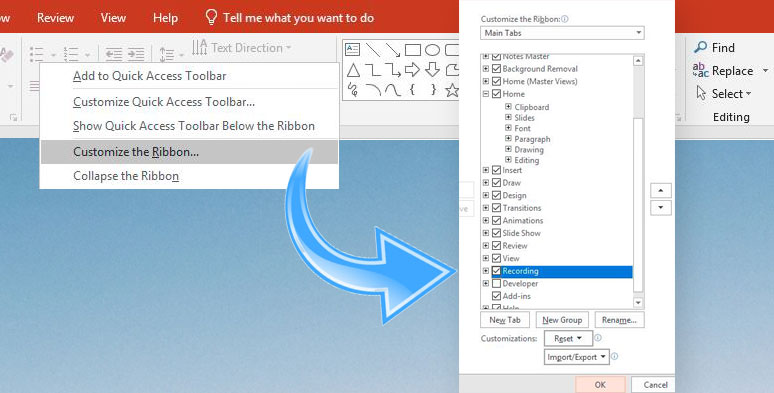
Customize PowerPoint recording ribbon
Then, you head back to the Ribbon, you have the recording tab, in which screen recording, audio recording, screenshot, and export to video options are all put together.
3. How to Video Record Yourself Presenting a PowerPoint
Again, this trick only works for PowerPoint Version 2019 or newer. So, do upgrade your PowerPoint in the first place.
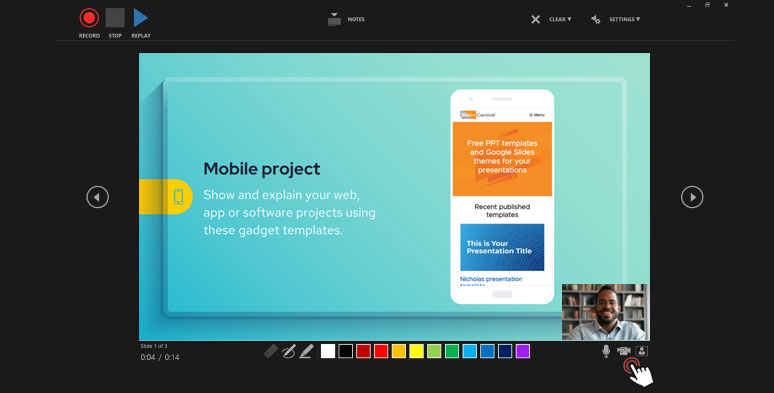
Turn on the webcam while recording a PowerPoint presentation
You may also use the pen to add annotation while recording your PowerPoint presentation.
4. How to Record a Smooth Audio for a PowerPoint Presentation
Once you’ve finished recording voice for a slide, stop talking until you advance to the next slide. Otherwise, if you keep speaking, part of your speech will be cut off.
5. Free Alternative to Recording a PowerPoint Presentation Recording with Audio and Video
Well, there are tons of apps to record a PowerPoint Presentation. But for novices and versatility, using RecordCast, a free online screen recorder with a video editor, saves you from lots of troubles.
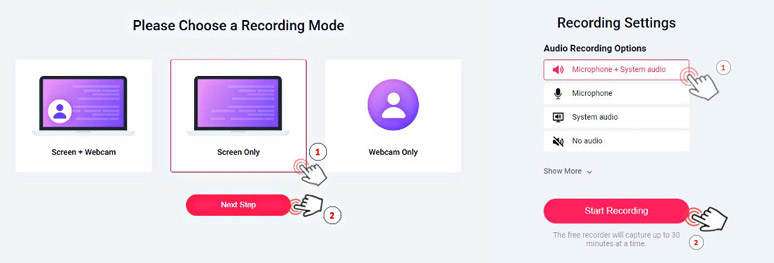
Select video and audio recording settings
If you prefer, you can select “Screen+ Webcam” mode to include your lovely face in the PowerPoint Presentation.
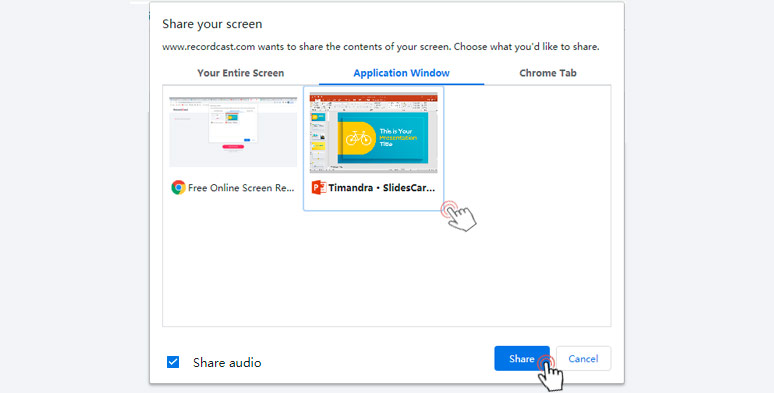
Choose PowerPoint app window for recording
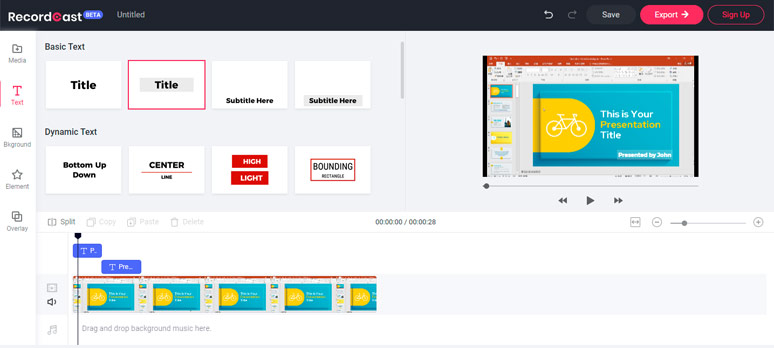
Edit PowerPoint recordings in RecordCast’s video editor
6. Brand-new Ways to Record a Presentation
Apart from the mainstream presentation editing software, nowadays, many free online video makers also integrate the presentation recording feature with their built-in video editor. Here, we recommend the two best options for you.
Option 1: Use Canva to Record a Presentation
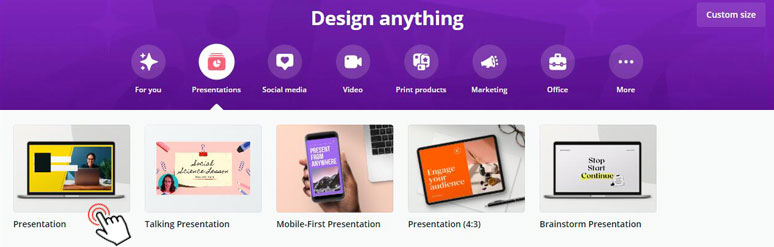
Use Canva’s pre-made presentation templates
Then you can select your camera and mic for recording.
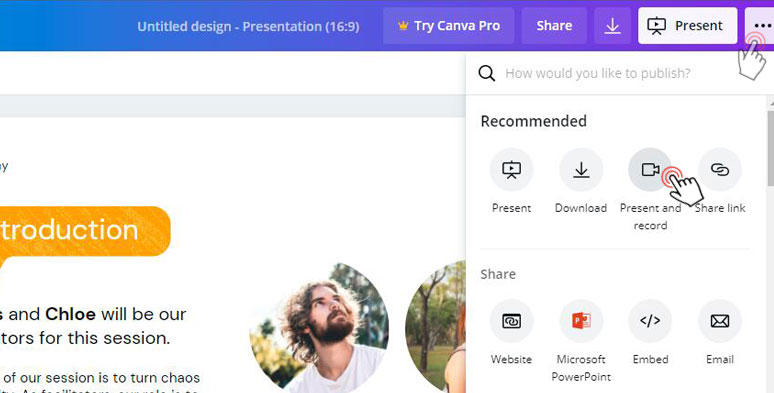
Click on the Present and Record button to start recording
Option 2: Use FlexClip to Record a Presentation
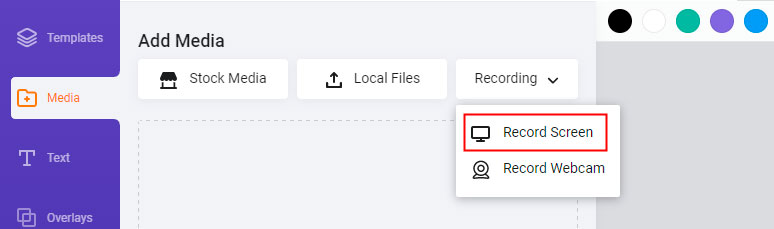
Click on “Recording Screen” for recording

Edit your PowerPoint presentation recording with FlexClip’s versatile video editor
You can easily trim your recording or add text, animations, and royalty-free music from Flexclip’s vast music library and finally export the presentation video to MP4 (1080P).
7. How to Add Background Music to Recorded PowerPoint Presentation Video
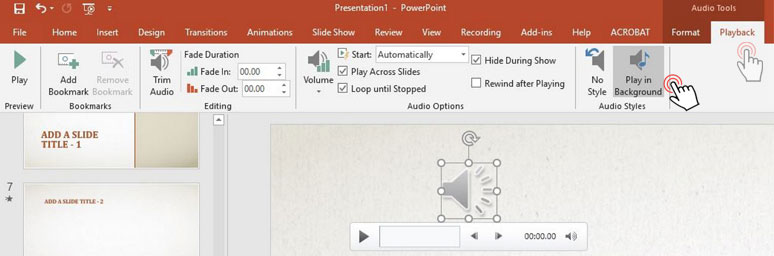
Insert audio as the background music of a PowerPoint presentation
You may also adjust its volume, or set the music to play across the slides, or loop until stopped or start automatically.
8. Best Way to Export Recorded PowerPoint Presentation as a Video
9. Why You Can’t Record a Presentation at Will
Well, not all presentation apps are as free as PowerPoint or Keynote. If you want to record a Zoom meeting presentation , you need to be the host or a paid user; for Mircosoft Teams and Google Slides, many of the recording features are only open to premium users or you have to get permission from the host.
So, in many cases, you do need a flexible screen recorder and video editor to record a presentation.
10. Best Screen Recorders to Record a Presentation Without Other Person Knowing and for Free
To record a public presentation on Zoom or Microsoft Teams and look back on it yourself, you need a user-friendly screen recorder.
Here, we introduce you to the top 10 best free screen recorders in 2021. It could be an online screen recorder capable of recording presentations with both audio and webcam or a powerful desktop app that has fancy screen recording and screencasting tools you need. Just take your pick.
11. Record a Presentation on Google Slides with Your Facecam and Audio for Free
To record Google Slides presentation with both facecam and audio, you need to install a free Chrome extension, i.e. " Record to Slides".
Click to add your webcam with audio to Google Slides

Choose the camera and mic for recording Google Slides
After the rendering, the recorded facecam video with audio will be added to Google Slides.
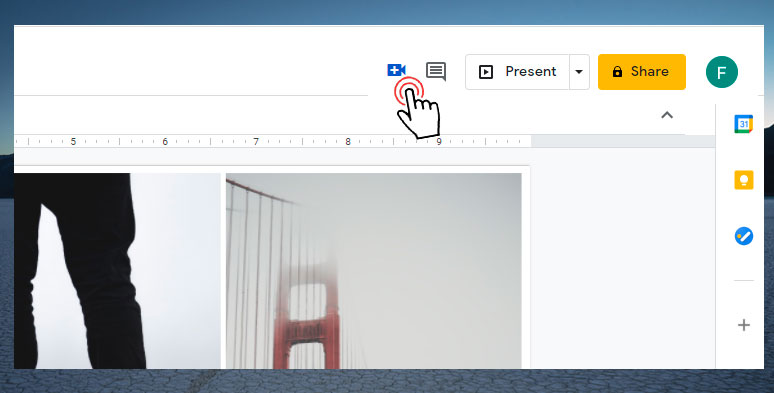
12. Easy Way to Convert Your Google Slides Presentation into a Video or GIF
You just finished recording the voiceover in Google Slides and then you wanna convert it into an HD video or a GIF. To do so, you need to use an add-on called "Creator Studio", which is an extra feature attached to Google Slides.
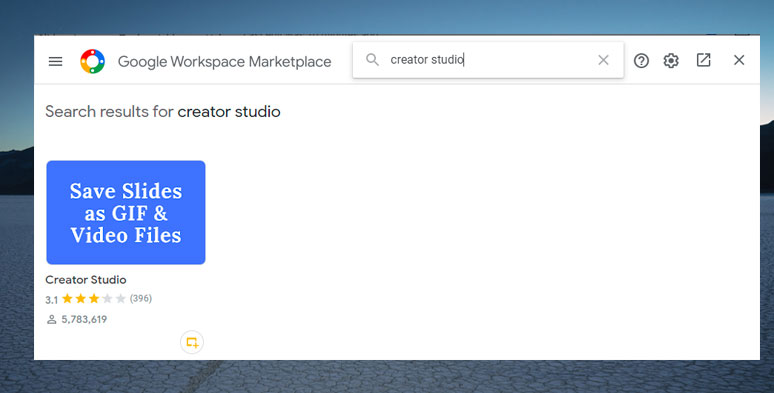
Find and install “Creator Studio” add-ons
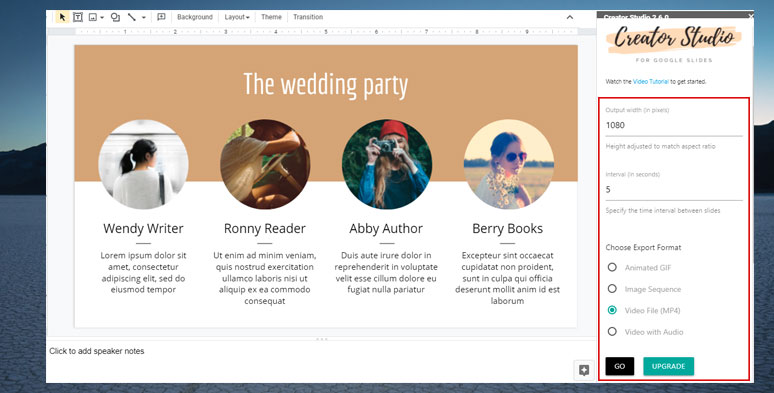
Customize the Google Slides’ export settings in Creator Studio
13. Quick Way to Record a Presentation Using Zoom with WebCam
Once you end the meeting, the recording will be automatically converted to MP4 video.
14. Best Way to Pre-record a PowerPoint Presentation Using Microsoft Teams
Hover to Controls and click on the " Share" Button and click "Browse" to import PPT from the local computer
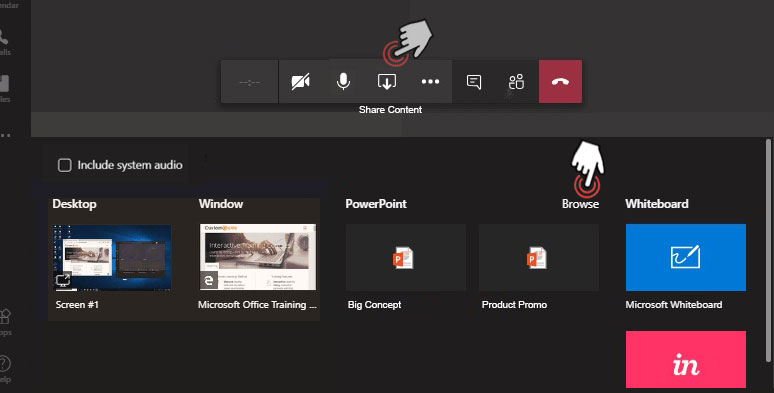
Upload PowerPoint slides to Microsoft Teams from the local computer
After you have done the recording, click the "Stop Recording" and the video recording will be saved in the Chat and Microsoft Stream.
15. Where to Find My Presentation Recording in Microsoft Teams Months after the Meeting
Navigate from Microsoft Teams to Microsoft Stream
You can search your meeting recording by entering the keywords or use a specific date or state to filter out your presentation recording.
16. Quick Way to Record Keynote Video Presentation Using QuickTime on Mac
Make sure your Keynote version is 10.3.9 or newer to use QuickTime to record Keynote presentation with audio and webcam. Check the ultimate guide to Quicktime screen recording.
Head to the "View" tab and select "Float on Top" to ensure your webcam stays on the top of the Keynote presentation. Next, you can shrink down your webcam and place it to the right corner of the Keynote presentation.
You may also decide where the recording is saved or the microphone you use in the option button.
To end the recording, hit the stop button on the top-right menu bar.
17. PowerPoint, Google Slides, Keynote, Which One Works Best to Record Presentations
Of all the 3 presentation-making apps, Microsoft PowerPoint, undoubtedly, is the most prestigious office software and has the edge over the other two for its versatile features for audio and video recording, when needed to record a presentation.
If you a business professional or college teacher, it’s highly recommended to use PowerPoint to record a presentation for its full-fledged features, even if it costs more.
While Google Slides and Keynote are completely free-to-use and their files are automatically saved to the Clouds. With chic pre-made templates, both Google Slides and Keynote become more popular with students.
However, Google Slides has no built-in audio recorder or converter to export slides into a video. So, you need to add add-ons like Pearl Deck or Creator Studio” to achieve the desiring effect. While you can easily use your iPhone to edit your presentation using Keynote and later use its desktop app to record a presentation.
18. How to Simplify OBS Setting to Record Any Presentation with Audio and Webcam
Don’t know where to start to record a PowerPoint presentation with audio and webcam using OBS Studio? Believe me, you are not alone.
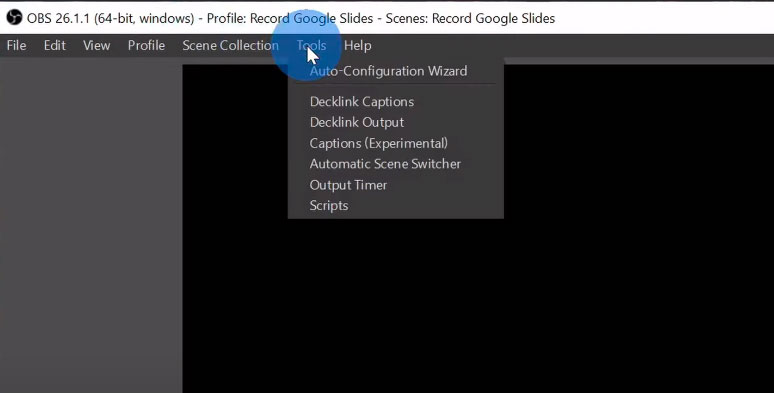
Though hailed as the free treasure trove of screen recording and gameplay streaming, OBS is notorious for its complex configuration buttons. Here is a simple way to customize your settings only for recording a presentation.
Select only recording mode in OBS Studio
Hover over to “Files” > Click on “ Settings” > “Output” > Adjust Recording Format to MP4
Go to “Sources” Tab > Tap “+” Button > Select “ Display Capture” (or what appears on your monitor) and Click on “OK”
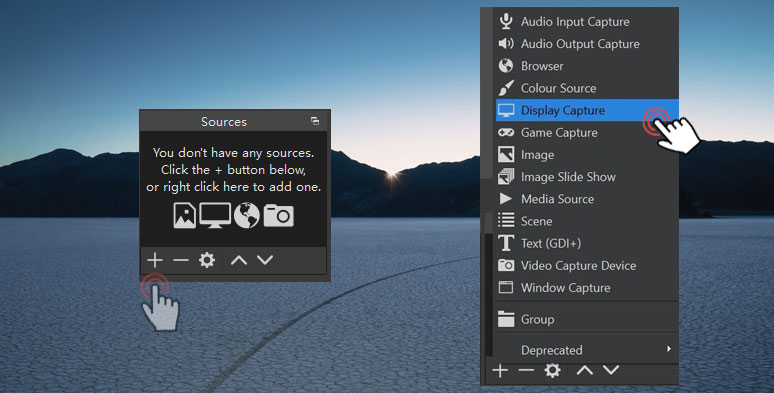
Select “Display Capture” to record your screen
If the recording area doesn’t fit the screen, just right-click the “Display Capture” in the Source and hit “Resize OutPut (source size).
Head to Go to “Sources” Tab > Tap “+” Button > Select “ Video Capture Device”, which means recording your webcam in OBS. Then click on “OK”. Now, you can have the visual of your webcam. Just resize it and place it in the right bottom corner of the screen.
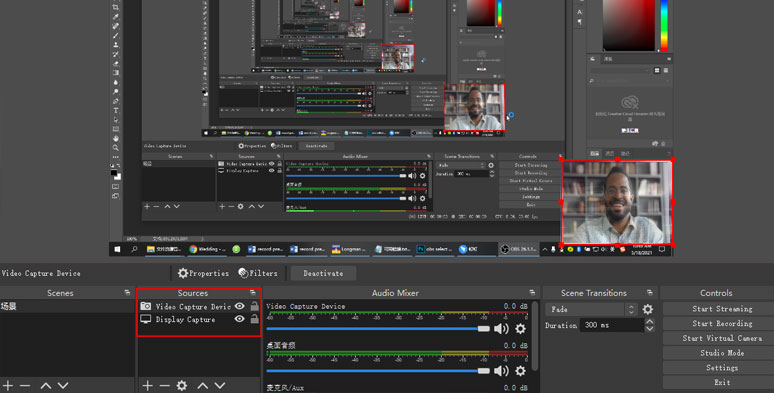
Add your webcam to be recorded in OBS Studio
Or you can set up a keyboard hotkey (go to “Files” > Hotkeys > Start/Stop Recording) to avoid recording your messy desktop before presenting your PowerPoint presentation
After you end the recording, go to “File” > “Show Recording” to find your recorded presentation video.
19. How to Record a Video Presentation That Won’t Bore the Audience
After all, whatever presentation-making and recording apps you use, it is the content of your video presentation that draws or dispels the viewers.
Here are few practical tips for you to record an engaging video presentation:
Final Thoughts
If you’ve covered all of our insider tips and tricks this far, you must have learned a lot for recording your video presentation. If you have more new tips to record a presentation we forgot to mention, don’t hesitate to tell us through our Facebook and don’t forget to share this post with your friends and colleagues.

Hot & Trending
-

How to Record Yourself and Your Screen at the Same Time on PC/Mac
-

How to Record Any Chrome Tab with Audio in Clicks
-
8 Best Free Screen Recorders with No Watermark
-

Top 19 Tips and Tricks to Record Presentations as a Video
-
How to Record Facebook Video Calls with both Video and Audio on Desktop, iPhone, Android
-
How to Record Google Meet for Free Gmail Users (PC & Mobile)
-

Best Way to Record Gameplay on PC 2021
-

Best Ways to Record an Interview with High-quality Audio and Video on Mac