You spent days crafting the PowerPoint presentation for an upcoming important webinar, yet still felt restless when asked to record the entire webinar by your boss?
No worries! My friends.
In this post, we will take Zoom webinar recording as an example and show you the top 8 fatal mistakes people commonly made when recording a live webinar, plus offering you the best solutions to avoid these avoidable pitfalls.
So, you can rest assured that you are 100% ready for the big day and can take full control as your record a webinar either as a host or an attendee.
1. Overlook the Lighting for Recording a Webinar
Having ample, even and soft lighting is probably one of the most overlooked issues when recording a webinar. Use it or lose it. Here are typical examples of how bad lighting turns your webinar recording and meeting into a nightmare.
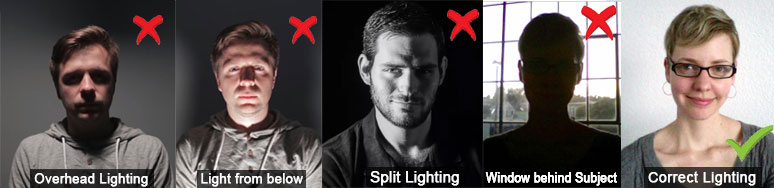
Different lighting to record a webinar
Now, you know how lighting makes a big difference as you record a webinar. Overall, what you should particularly avoid is:
Under these conditions, harsh shadows will be cast over the entire or parts of your face, producing a horrible face to the webinar attendees, not to mention the webinar recording effect.
So, for most people who have no studio light or don’t have a nice window in the room, what should you do? Here, we offer you two popular lighting setup when you record a webinar:
*Use Two Lamps Setup: Place two adjustable lamps at 45 degrees beside your laptop to create an even light for your face. You may add an extra lamp behind to give you the rim light and separate you from the dark background.

Use two lights setup to create flattering light
*Use a Ring Light Setup: Buy a cheap ring light and place it right behind your laptop or desktop computer to create flattering light over your face with beautiful catch light in your eyes.
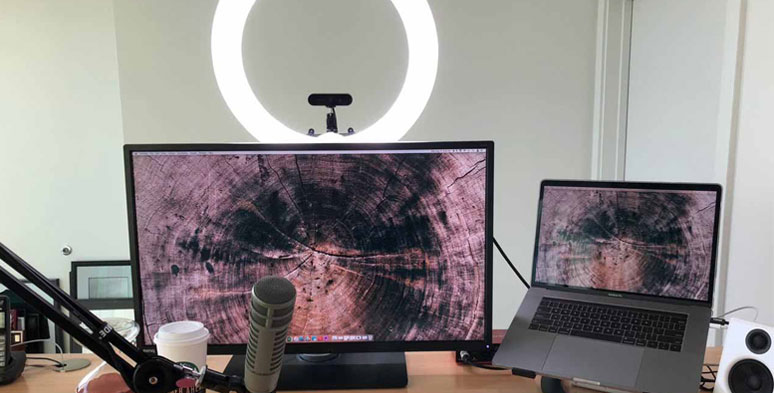
Use one ring light to create the perfect illumination
2. Record a Webinar without Having Files and Computer Ready
Another disastrous mistake when recording a webinar is that the computer screen of the webinar host keeps popping up annoying ads and unrelated notifications. It seriously compromises webinar recording and extremely distracting to viewers.
So, before you record a webinar, you may consider doing the followings:
Take Zoom webinar, for example, you can easily access these files whenever you want as you record the webinar. Just click on “Share Screen” > select the “Files” tab to import your PowerPoint from the Clouds.
3. Use Internal Microphone to Capture the Audio
Nowadays, every laptop has a built-in microphone for audio recording, yet the quality of the audio captured by an internal mic is far less satisfactory than those recorded by an external microphone. You are 3 times likely to have more background noise and buzzing sound when you playback the webinar recording. Find out how to record screen with audio.
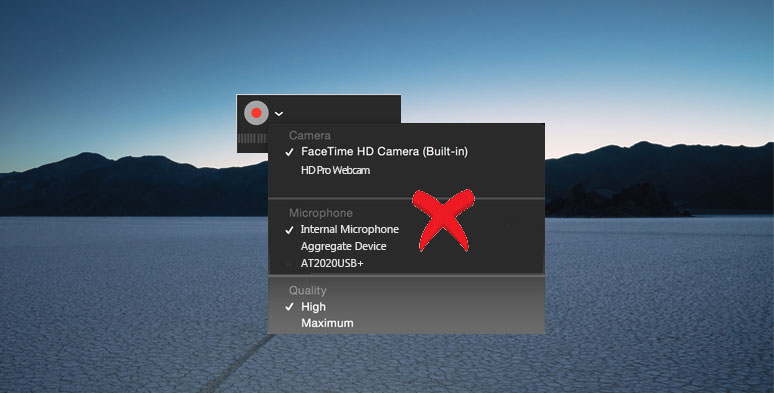
Never use the internal microphone for audio recording
So, only use the internal mic as the last option or backup. Instead, if you want to record a webinar with clear audio recording, buying an external mic is always the best option. For example, the affordable choice is Rode NT-USB Mini USB Microphone, for sale at only $99.
If you don’t have an external mic as you record a webinar in a hotel, you can use your iPhone’s headphone as a backup external mic for the webinar recording. Just have it connected to your laptop, then you are ready to speak through the headphone.
4. Never Do a Test Run for Recording a Session
You might be a seasoned public speaker. However, that doesn’t mean you are not exempt from having unexpected troubles as you deliver the speech and record the webinar at the same time. Here are what you can benefit from doing a test run for recording a webinar session:
5. Ignore the Webinar Recording Requirements and Limitations on Different Platforms
Well, there are tons of platforms available for hosting a webinar. Zoom, GoToWebinar, Demio, Livestorm, Microsoft Teams, Google Hangouts, etc. you name it. If you ignore their specific recording requirements and limitations, esp as a webinar attendee, you could run into trouble.
Currently, for most of the webinar recording software, only the host or co-host is entitled to record a webinar.
Take Zoom webinar for example:
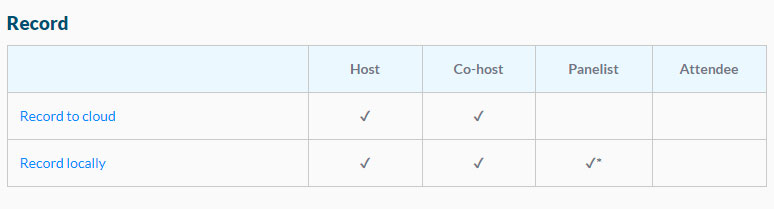
Who can record a Zoom meeting
Only the host, co-hosts, and panelists with recording permission (full-participant of a webinar)can record a webinar locally. While the host and co-host can record a webinar to Cloud and keep the recording there for 28 days. Sitting at the lowest hierarchy is the attendee, who has no way to record a Zoom webinar by its built-in Zoom screen recorder.
However, where there is a will, there is a way. So, if you try to record a Zoom webinar as a participant, you may use many third-party screen recorders. One of the flexible options is using RecordCast, an all-in-one online screen recorder with a built-in video editor.
So, how to record a Zoom webinar by RecordCast:
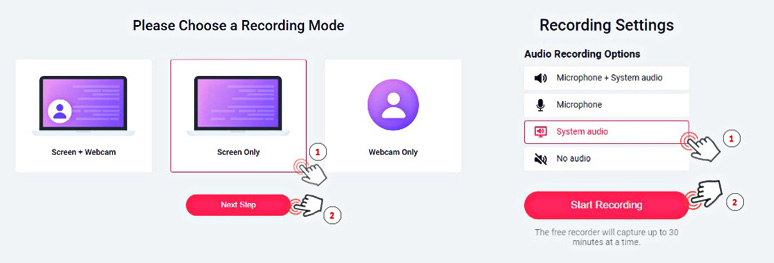
Customize video and audio recording mode

Select Zoom app window to start recording a webinar
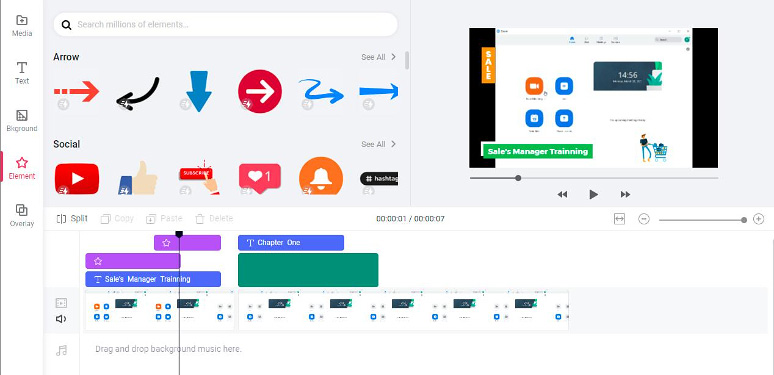
Edit Zoom webinar meeting with RecordCast’s video editor
6. Always Use the Default Settings to Record a Webinar
It's fine to use the default settings of a webinar recording software like Zoom. But, why not give it a go to take full advantage of full-featured Zoom webinar recording options. It only makes webinar recording more time-saving and user-friendly to you.
Take Zoom, for example, Go to "Setting" > "Recording", then you can have plenty of zoom webinar recording options to be customized:
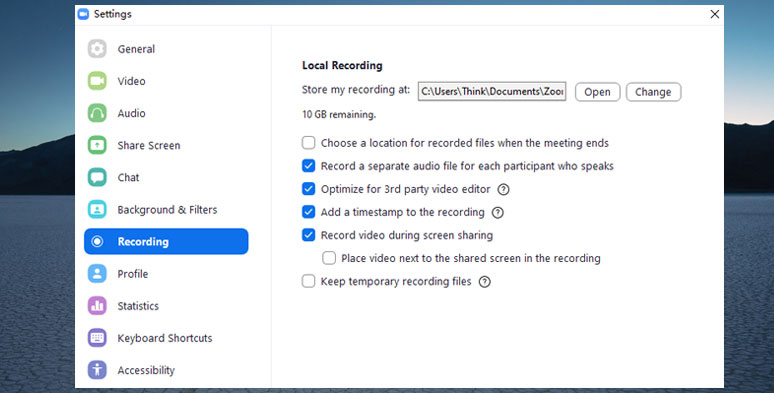
Customize Zoom recording settings to facilitate webinar recording
You can easily customize the above options when needed. If you are a premium business account, you can have even more fully customizable options to record a Zoom webinar to the Cloud.
7. Forget the Option to Pre-record a Webinar
If you are the host of a scheduled Zoom webinar, yet, you have more urgent matters to deal with and can't make it to the webinar on a designated date. Canceling the scheduled webinar definitely should be your first option.
Instead, you can pre-record a webinar using your PowerPoint presentation and share it with attendees via email or Google Drive, or the meeting chatbox. Discover the top 19 tricks to record presentations as a video.
How to pre-record a webinar on Zoom:
Once you end the meeting, the recording will be automatically saved as an MP4 video, together with an mp3 audio file, to your assigned location in the local drive.
Then you can embed it in your email or Google Drive, or the meeting chatbox to share with the attendees as the designated date.
8. Don’t Know How to Use Your Webinar Recording
Recording a webinar and sharing it are inseparable. If you think the attendees and absent colleagues are the only people to share with your webinar recordings, think again. Here are some of the most trendy host platform to expand your presence in cyberspace.
Final Thoughts
So, hopefully, you can avoid all of these 8 fatal yet avoidable mistakes as you prepare and record a webinar for the upcoming webinar. If you find our suggestions inspirational and helpful, don't forget to share them with your friends. Or try using our mentioned screen recorder like RecordCast to record a webinar with complete success.

Hot & Trending
-

How to Record Yourself and Your Screen at the Same Time on PC/Mac
-
How to Record Any Chrome Tab with Audio in Clicks
-
8 Best Free Screen Recorders with No Watermark
-

Top 19 Tips and Tricks to Record Presentations as a Video
-
How to Record Facebook Video Calls with both Video and Audio on Desktop, iPhone, Android
-
How to Record Google Meet for Free Gmail Users (PC & Mobile)
-
Best Way to Record Gameplay on PC 2021
-

Best Ways to Record an Interview with High-quality Audio and Video on Mac