Want to record your computer screen for a presentation at work or a how-to video for YouTube? Both Windows PC and macOS, coming with built-in tools, allow you to record your screen activity. Besides, many online screen recorders and third-party computer screen recording softwares can also help you do a screen-recording.
Now let's see how to use all available tools to record your computer screen on a PC & Mac.
Quick Navigation:
You May Also Like: 5 Best Mac Screen Recorders with Audio in 2021 >
Part 1 Record the Computer Screen Using Free Online Screen Recorder
The first way recommended for you to record your computer screen is using the online screen recorder, RecordCast. It is the easiest computer screen recorder to capture the screen on a PC and Mac smoothly.
Frankly, many online computer screen recorders can be used to capture your screen. What makes RecordCast stand out is that it's entirely free to use and watermark-free. With a few clicks, you can start recording your entire screen, application windows, or Chrome Tab. Besides recording screen, webcam, and audio, RecordCast also allows you to make some edits to your recorded video, such as trimming, splitting, adding text and music, and more.
Steps to record your screen with RecordCast both on a PC & Mac:
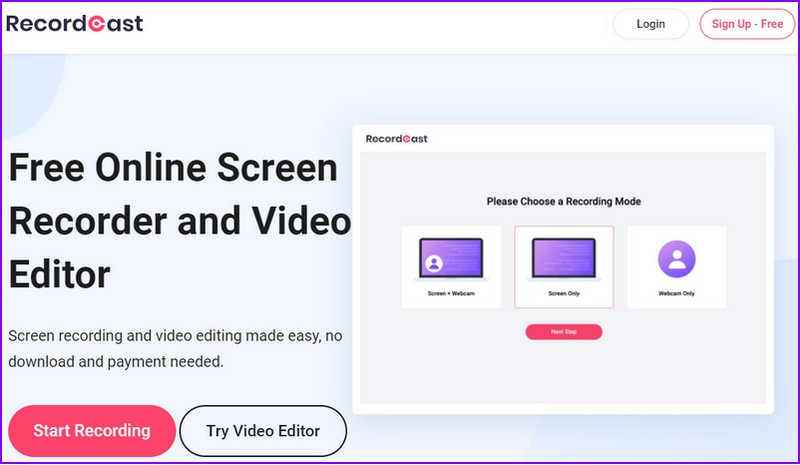
Image Board: Online Screen Recorder - RecordCast: Step 1
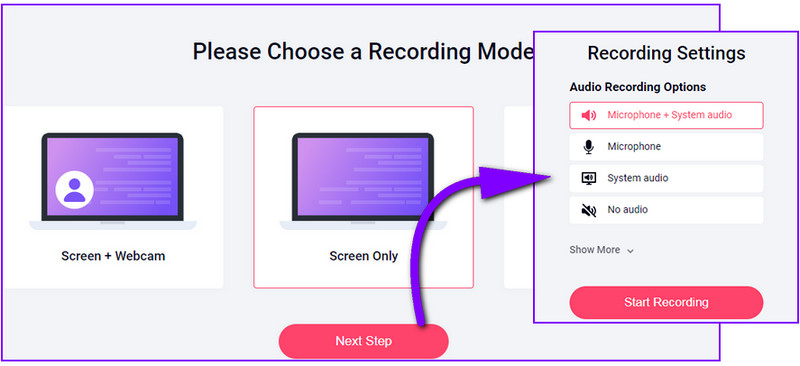
Image Board: Online Screen Recorder - RecordCast: Step 2
Part 2 Record Computer Screen with Built-in Tools on a PC & Mac
Whether you're working on a PC or Mac, you can capture your computer screen thanks to their built-in tools.
2.1 Record Your Screen with the Windows Game Bar
Game Bar, built into Windows 10, is primarily designed for gamers to record their gameplay. It can also be used for any open application, offering a convenient way to record the screen and even add audio if needed.
You can use Game Bar to record activity in most applications, except the Windows desktop, File Explorer, and specific Windows apps, such as Weather.
To record your computer screen with Game Bar, follow the simple steps below:
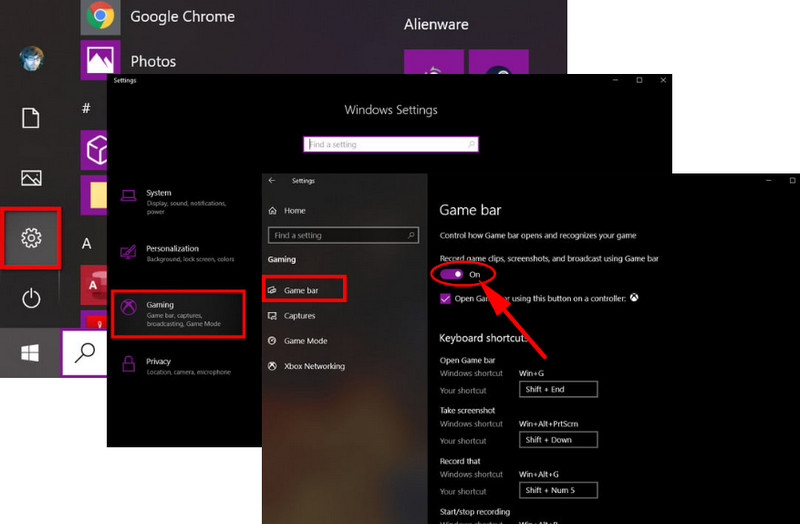
Image Board: Record Your Screen on Windows 10 via Game Bar
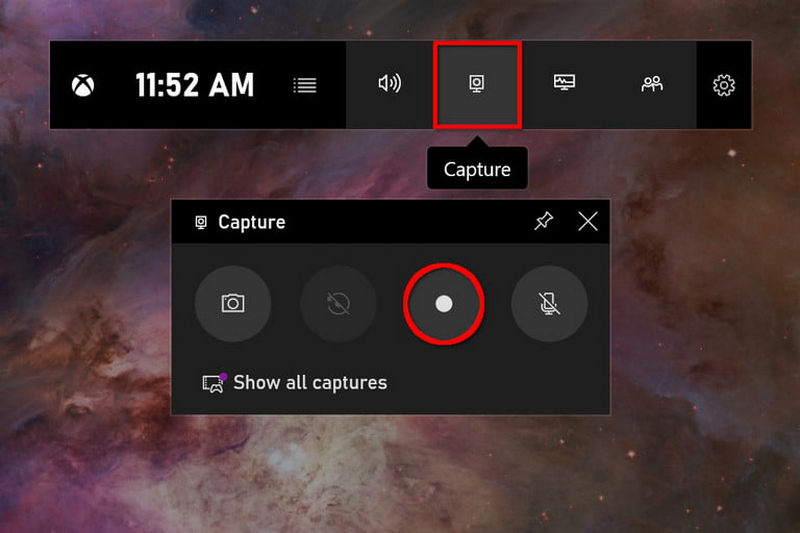
Image Board: Record Your Screen on Windows 10 via Game Bar
One thing to mention is that though Game Bar is quite user-friendly to record a gameplay like Minecraft, it doesn't have many video editing tools to edit your recordings. If you wanna speed up certain video footage or add video transitions, etc., using FlexClip's free video editing tools could be a viable option.
2.2 Record Your Computer Screen on Mac
Need to record your computer screen on a Mac? Here we'll share two ways for you to record your screen on your Mac:
If you're using macOS Mojave or higher, you can record your computer screen with its own screen-recording feature. Here's how:

Image Board: Record Your Screen on Mac via Command + Shift + 5
If you're running a version of macOS older than Mojave, you can start the screen recording directly from QuickTime Player.
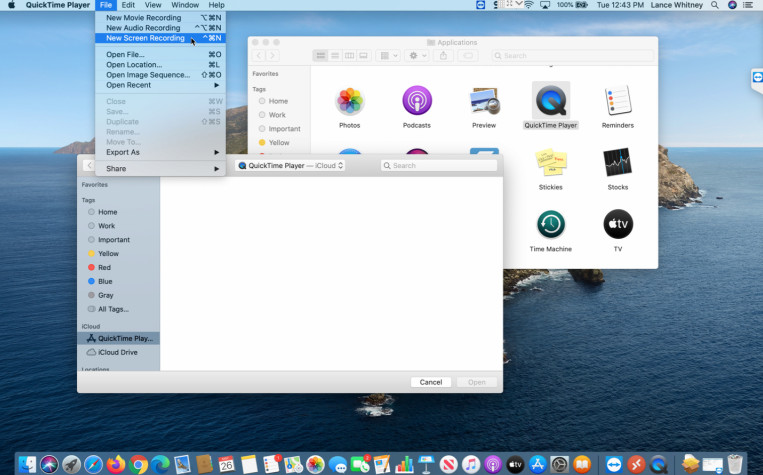
Image Board: Record Your Screen on Mac via QuickTime Player
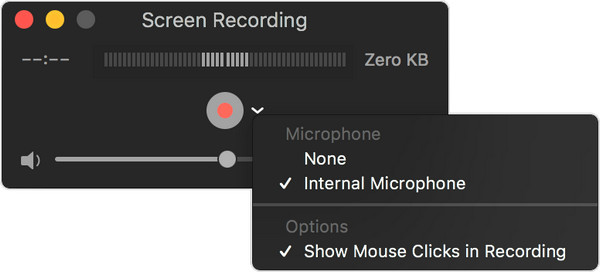
Image Board: Record Your Screen on Mac via QuickTime Player
Find out how to use QuickTime to record internal audio and webcam.
Part 3 Third-party Screen Recording Softwares to Capture Your Screen
Besides the online screen recorder and the built-in tools, many third-party screen recording softwares are available to capture your computer screen, like OBS Studio, Free Cam, etc.
OBS Studio (Windows & Mac)
Compatible with Windows and macOS, OBS Studio proves to be the best and free computer screen recorder to help you record your screen activity, microphone, and computer audio, then saves the output as an MP4 file. It also has built-in streaming functions for those who want a live audience while recording.
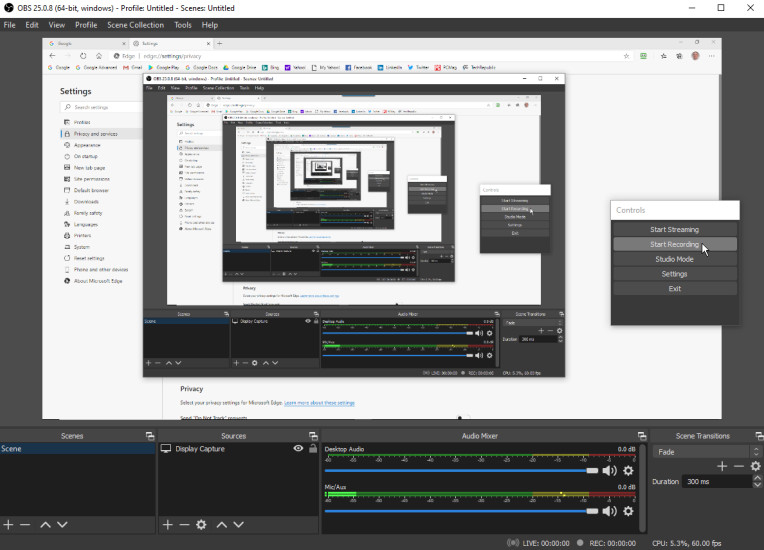
Image Board: OBS Studio
Free Cam (Windows)
For a Windows user, Free Cam is an extremely basic screen recorder to capture the computer screen for free. It captures your screen activity and audio, then saves your recording as a WMV file.
Image Board: Free Cam Screen Recorder
Final Words
That's all for the best computer screen recorders and how to use them to capture your screen on PC and Mac. To sum it up, it's much easier to use RecordCast screen recorder than other ways on a PC and Mac to record your computer screen. Moreover, RecordCast gives you more options to edit your recordings.

Hot & Trending
-

How to Record Yourself and Your Screen at the Same Time on PC/Mac
-

How to Record Any Chrome Tab with Audio in Clicks
-

8 Best Free Screen Recorders with No Watermark
-

Top 19 Tips and Tricks to Record Presentations as a Video
-

How to Record Facebook Video Calls with both Video and Audio on Desktop, iPhone, Android
-

How to Record Google Meet for Free Gmail Users (PC & Mobile)
-
Best Way to Record Gameplay on PC 2021
-

Best Ways to Record an Interview with High-quality Audio and Video on Mac